Transforms
So you have a list of primitives to work with, but what if they are not in the right place? What if they need to face a different way, or stretch? Transformations are the first step in turning a primitive into something more interesting. In this tutorial we will learn how to use simple transformations to move, rotate, scale, and twist data sources.
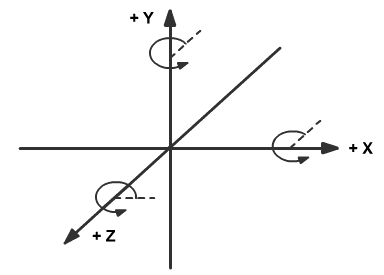
The first concept to understand for transformations is the coordinate system we are using. ShapeJS uses a right handed Y-UP system.
To learn our first transformation let's start with a simple torus.
function main(args) {
  var radius = 20 * MM;
  var sphere = new Sphere(radius);
  var s = 20*MM;
  return new Scene(sphere, new Bounds(-s,s,-s,s,-s,s));
}
Not much to look at. But this shape will make it easy to see the transformations.
1. Translate
The translate function allows you to move any data source by applying a 3D vector to it. Since some shapes automatically center at the origin, this is helpful in relocating those data sources to where you want them.
function main(args) {
    var torus = new Torus(4*MM, 1*MM);
    var translate = new Translation(new Vector3d(-5*MM, -5*MM, 8*MM));
    torus.setTransform(translate);
    var s = 10*MM;
    return new Scene(torus, new Bounds(-s,s,-s,s,-s,s));
}
2. Scale
We can also scale the data source. In this case we are doing a non uniform scale, to create a severe distortion. Here we can see that a fundamental change has happened to our shape: we could not make this simply using different options for the Torus.
function main(args) {
    var torus = new Torus(4*MM, 1*MM);
    var scale = new Scale(1.5, 1, 1);
    torus.setTransform(scale);
    var s = 10*MM;
    return new Scene(torus, new Bounds(-s,s,-s,s,-s,s));
}
(Note: Certain kinds of shapes, such as planes or cones, go to infinity in one or more directions, so scaling them will not have the same effect, and may look more like translations.)
3. Rotate
Rotation is useful for a lot of shapes, like the Torus, which start out facing a specific direction. We can use the Rotation transform in order to turn the object, in radians, around a specific axis. This lets us tell it to face the direction we actually want it to.
function main(args) {
    var torus = new Torus(4*MM, 1*MM);
    var axis = new Vector3d(0, 1, 0);
    var rotate = new Rotation(axis, Math.PI/3);
    torus.setTransform(rotate);
    var s = 10*MM;
    return new Scene(torus, new Bounds(-s,s,-s,s,-s,s));
}
We can also change the center for rotation, which is where the axis extends from. By default, the data source will simply rotate around the origin. But by changing its rotation center, we can change the end result dramatically.
function main(args) {
    var torus = new Torus(4*MM, 1*MM);
    var axis = new Vector3d(1,2,0);
    var rot_center = new Vector3d(-1*MM, -5*MM, 10*MM);
    var rotate = new Rotation(axis, Math.PI/3, rot_center);
    torus.setTransform(rotate);
    var s = 10*MM;
    return new Scene(torus, new Bounds(-s,s,-s,s,-s,s));
}
The new rotation axis, even with the same actual rotation, has resulted in our Torus going outside the Bounds of the scene, hence the red. As always, you can fix this by upping the size of the Bounds.
function main(args) {
    var torus = new Torus(4*MM, 1*MM);
    var axis = new Vector3d(1, 2, 0);
    var rot_center = new Vector3d(-1*MM, -5*MM, 10*MM);
    var rotate = new Rotation(axis, Math.PI/3, rot_center);
    torus.setTransform(rotate);
    var s = 11*MM;
    return new Scene(torus, new Bounds(-s,s,-s,s,-s,s));
}
4. Twist
This transform performs a twist of space via rotation about z-axis. Try a twist on a simple box.
function main(args) {
    var box = new Box();
    var twist = new Twist(0.01);
    box.setTransform(twist);
    var s = 10*MM;
    return new Scene(box, new Bounds(-s,s,-s,s,-s,s));
}
(Note: A lower value means a higher rate of twist. Be careful that the data source does not become too thin.)
Now let's apply a twist on a torus.
function main(args) {
    var torus = new Torus(4*MM, 1*MM);
    var twist = new Twist(0.01);
    torus.setTransform(twist);
    var s = 10*MM;
    return new Scene(torus, new Bounds(-s,s,-s,s,-s,s));
}
There doesn't seem to be much of a twist. This is because the function twists around the same axis the torus is facing, the Z axis. The torus is completely symmetrical in that direction, so the twist will do nothing to visibly change its shape no matter what we set it to. In order to see the twist, we will need to rotate the shape first, so that it is not aligned with the Z axis. To do that, we need to learn how to apply multiple transformations to a single data source.
5. Composite Transform
Trying to use setTransform () to perform multiple transformations on your objects will not work. ShapeJS will only pay attention to the latest applied transform. If you need to apply multiple transformations to an data source, you will need to create a CompositeTransform() and apply it to the data source. To get a nice twist to the torus, we are going to need to rotate it first, so that when the twist takes effect it will not be in line with the torus.
function main(args) {
    var torus = new Torus(4*MM, 1*MM);
    var compTransform = new CompositeTransform();
    compTransform.add(new Rotation(Vector3d(1, 0, 0), Math.PI/2));
    compTransform.add(new Twist(0.01));
    torus.setTransform(compTransform);
    var s = 10*MM;
    return new Scene(torus, new Bounds(-s,s,-s,s,-s,s));
}
Since we rotated the Torus first, it is now properly twisted. Try adding in the scale and translate functions as well, you can add in as many transformations as you want to using this method.
The order in which you add the individual transformations is the order in which they will be carried out, so changing the order could create radically different end results. If you wanted, for example, to have a twisted torus still end up facing along the Z axis, you could rotate it, twist it, and then rotate it back to its original orientation, with the twist still intact. If you twisted before that first rotation, you would end up with no visible twist. Now that you know all this, we're ready to start modeling.