Emboss and Engrave
The ability to emboss and engrave text and images is incredibly useful for customization purposes. In this tutorial we will learn how to emboss and engrave images, as well as set up patterning with both of those functions.
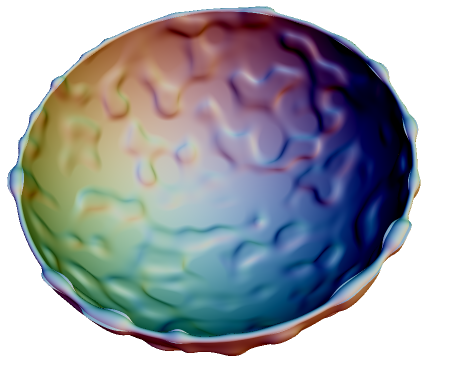
Here we will just grab a volume pattern. Previously we have learned how to create an intersection with a data source and a volume pattern. but that can be a bit dangerous, due to it going all the way through the object. For a bowl, whose primary purpose is to hold things, it would be entirely unworkable. Now we could go to great lengths to model a slightly smaller bowl within the bowl in order to prevent leakage, but that seems excessive. What we can do instead is add a pattern but not as an Intersection or a subtraction. We can instead add it as an embossing. This will allow us to control how much detail it adds, how deep or how far out it goes, etc. With this control we can easily make sure we have a printable, useful bowl.
1. Emboss
Embossing is a function that allows us to add material to a data source according to another data source. It is different from Add() or Union(), however, in that it allows you to control the minimum and maximum height resulting from the process.
var uiParams = [
  {
      name: "factor",
      desc: "Factor",
      type: "double",
      rangeMin: 0,
      rangeMax: 5,
      step: 0.01,
      defaultVal: 2.5
  },
  {
      name: "size",
      desc: "Size",
      type: "double",
      rangeMin: 1,
      rangeMax: 20,
      step: 0.1,
      defaultVal: 10
  },
  {
      name: "maxValue",
      desc: "maxValue",
      type: "double",
      rangeMin: 0,
      rangeMax: 5,
      step: 0.1,
      defaultVal: 1
  }
];

function main (args) {
  var radius = 80*MM;
  var thickness = 4*MM;

  var sphere_out = new Sphere(radius);
  var sphere_in = new Sphere(radius-thickness);
  var torus_rim = new Torus(radius-thickness/2, thickness/2);
  torus_rim.setTransform(new Rotation(new Vector3d(1,0,0), Math.PI/2));

  var removed = new Subtraction(sphere_out, sphere_in);
  var topped = new Subtraction(removed, new Plane(new Vector3d(0,-1,0),0));
  var rounded = new Union(topped, torus_rim);

  var period = args.period*MM;
  var translation = args.translation*MM;

  var size = args.size*MM;
  var pattern = new Noise(new Vector3d(size, size, size),1,1,1);
  pattern.setFactor(args.factor*MM);
  pattern.setSize(new Vector3d(size, size, size));

  var embossed = new Embossing(rounded, pattern);
  embossed.set("maxValue", args.maxValue*MM);
  embossed.set("minValue", 0*MM);
  embossed.set("factor", 1);
  embossed.set("blend", 0.2*MM);

  var s = 101*MM;
  return new Scene(embossed, new Bounds(-s, s, -s, s, -s, s));
}
(Note: Embossing adds volume to your object. Make sure that the bounds are large enough to accommodate this, particularly if you are letting shoppers decide how thick the embossing should be.)
See if can do only one side?
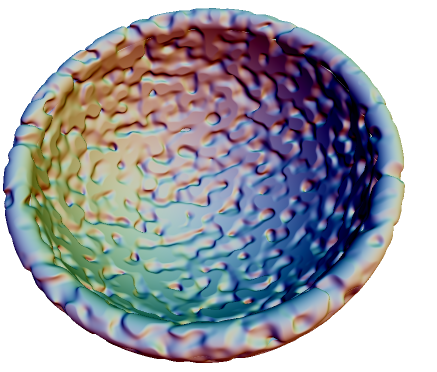
2. Engrave
In ShapeJS, engraving works off of the same function that embossing does. Did you notice the "minValue" parameter? Last time, we had it set to zero, because we only wanted embossing. Now, let's add in another slider, to allow us to set that negative. This means that rather than adding volume to the bowl according to the pattern, we will now actually remove material from it.
var uiParams = [
  {
      name: "factor",
      label: "Factor",
      desc: "Factor of engrave pattern",
      type: "double",
      rangeMin: 0,
      rangeMax: 5,
      step: 0.01,
      defaultVal: 3
  },
  {
      name: "size",
      label: "Size",
      desc: "Size of engrave pattern",
      type: "double",
      rangeMin: 1,
      rangeMax: 20,
      step: 0.1,
      defaultVal: 10
  },
  {
      name: "minValue",
      label: "Min height",
      desc: "Minimum engrave height",
      type: "double",
      rangeMin: -5,
      rangeMax: 0,
      step: 0.05,
      defaultVal: -3
  }
];

function main (args) {
  var radius = 80*MM;
  var thickness = 12*MM;

  var sphere_out = new Sphere(radius);
  var sphere_in = new Sphere(radius-thickness);
  var torus_rim = new Torus(radius-thickness/2, thickness/2);
  torus_rim.setTransform(new Rotation(new Vector3d(1,0,0), Math.PI/2));

  var removed = new Subtraction(sphere_out, sphere_in);
  var topped = new Subtraction(removed, new Plane(new Vector3d(0,-1,0),0));
  var rounded = new Union(topped, torus_rim);

  var period = args.period*MM;
  var translation = args.translation*MM;

  var size = args.size*MM;
  var pattern = new Noise(new Vector3d(size, size, size),1,1,1);
  pattern.setFactor(args.factor*MM);
  pattern.setSize(new Vector3d(size, size, size));

  var min = Math.max(args.minValue, -args.thickness/2+2)*MM;

  var embossed = new Embossing(rounded, pattern);
  embossed.set("minValue", min);
  embossed.set("maxValue", 0*MM);
  embossed.set("factor", 1);
  embossed.set("blend", 0.2*MM);

  var s = 101*MM;
  return new Scene(embossed, new Bounds(-s, s, -s, s, -s, s));
}
(Note: Be careful if you decide to engrave all the way through a data source. If you are making, say, a bracelet, you may end up partially engraving the far side of it when you don't want to. Also, if you decided to engrave something like a letter "R," with an encircled section, that piece would be loose, and likely lost as a result. Even if you don't go all the way through a data source, make sure to look at how the engraving will impact your wall thickness, as it could easily take it below the minimum for whatever material you are using.)
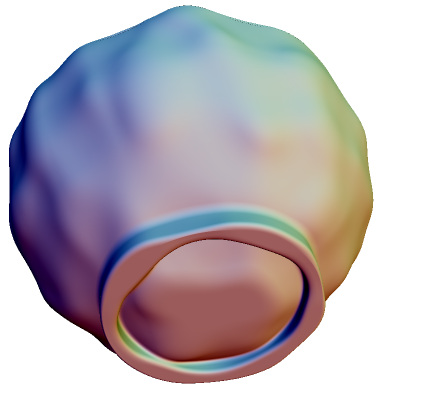
3. Targeting a Material
We also have a limiter on the engraving depth to make sure that it does not make the walls too thin. Since we are going for a 2 mm minimum, this bowl is currently targeted to plastic. but wouldn't we rather go porcelain for a bowl? Probably, but it will require us ensuring wall thickness between 3 and 15mm, as well as adding a base. The more complicated a creator the more likely it becomes that it's possible to make something unprintable. However, problems like a piece going below minimum wall thickness are both easy for us to deal with and difficult for the shopper to even see, so it is best to address it. Similarly, if you were adding smaller embossed or engraved details you would want to ensure that they would show up if glaze was applied.
(Note: If you want to target multiple materials either make that a UI parameter or create multiple makers: you can't expect shoppers to know all the material rules. Make it as hard as you can for them to create something that cannot be successfully printed.)
var uiParams = [
  {
      name: "thickness",
      desc : "Thickness",
      type : "double",
      rangeMin: 3,
      rangeMax: 8,
      step: 0.5,
      defaultVal: 4

  },
  {
      name: "factor",
      desc: "Factor",
      type: "double",
      rangeMin: 0,
      rangeMax: 4,
      step: 0.01,
      defaultVal: 1
  },
  {
      name: "size",
      desc: "Size",
      type: "double",
      rangeMin: 1,
      rangeMax: 25,
      step: 0.1,
      defaultVal: 10
  },
  {
      name: "minValue",
      desc: "minValue",
      type: "double",
      rangeMin: -3,
      rangeMax: 0,
      step: 0.1,
      defaultVal: 0
  },
  {
      name: "maxValue",
      desc: "maxValue",
      type: "double",
      rangeMin: 0,
      rangeMax: 3,
      step: 0.1,
      defaultVal: 1
  },
  {
      name: "blend",
      desc: "blend",
      type: "double",
      rangeMin: 0,
      rangeMax: 2,
      step: 0.1,
      defaultVal: 0.1
  }
];

function main (args) {
  var radius = 80*MM;
  var thickness = args.thickness*MM;

  var sphere_out = new Sphere(radius);
  var sphere_in = new Sphere(radius-thickness);
  var torus_rim = new Torus(radius-thickness/2, thickness/2);
  torus_rim.setTransform(new Rotation(new Vector3d(1,0,0), Math.PI/2));

  var c1 = new Cylinder(new Vector3d(0,0,0), new Vector3d(0,-radius,0),radius/2);
  var c2 = new Cylinder(new Vector3d(0,0,0), new Vector3d(0,-1,0),radius/2-thickness);

  var pedastal = new Subtraction(c1,c2);
  pedastal.set("blend", args.blend*MM);

  var on_ped = new Union(pedastal, sphere_out);
  on_ped.set("blend", args.blend*MM);

  var removed = new Subtraction(on_ped, sphere_in);
  var topped = new Subtraction(removed, new Plane(new Vector3d(0,-1,0),0));
  var rounded = new Union(topped, torus_rim);

  var period = args.period*MM;
  var translation = args.translation*MM;

  var size = args.size*MM;
  var pattern = new Noise(new Vector3d(size, size, size),1,1,1);
  pattern.setFactor(args.factor*MM);
  pattern.setSize(new Vector3d(size, size, size));

  var min = Math.max(args.minValue, -args.thickness/2+2)*MM;

  var embossed = new Embossing(rounded, pattern);
  embossed.set("minValue", min);
  embossed.set("maxValue", args.maxValue*MM);
  embossed.set("factor", 1);
  embossed.set("blend", args.blend*MM);
  var remove_cyl = new Cylinder(new Vector3d(0,-radius-min,0), new Vector3d(0,-1,0),1);
  var smoothed = new Subtraction(embossed, remove_cyl);
  smoothed.set("blend", args.blend*MM);


  var s = 101*MM;
  return new Scene(smoothed,new Bounds(-s, s, -s, s, -s, s));
}
(Note: Be careful if you decide to engrave all the way through a data source. If you are making, say, a bracelet, you may end up partially engraving the far side of it when you don't want to. Also, if you decided to engrave something like a letter "R," with an encircled section, that piece would be loose, and likely lost as a result. Even if you don't go all the way through a data source, make sure to look at how the engraving will impact your wall thickness, as it could easily take it below the minimum for whatever material you are using.)