Script Parameters
Creating parameters on your model which the user can adjust is an easy way of creating a product which they can make their own. In this tutorial we will learn how to define parameters for the script.
UI parameters are used to allow the dynamic adjustment of script parameter values. All parameters contain these properties
- name - The name of the parameter
- label - Hint to label a parameter in the UI
- desc - A description of the parameter
- type - The type of the parameter
- defaultVal - The default value of the parameter
You will use slightly different methods to describe other variable types, as we will soon learn. The "rangeMin" and "rangeMax" parameters define the lowest and highest values that can be put in, and step is essentially the units that you can add between them, essentially the smallest change allowed to the user. The value starts at defaultVal, presuming that defaultVal is within the range.
(Note: This is not limited to the parameters we talked about in the last tutorial. You can have users define variables, as we are about to see, and load text or images, as we will get to in later tutorials.)
Before we get started, here is a quick rundown of the more common kinds of UI Parameters you can create:
var uiParams = [
  {
    // double: A simple number, with a decimal point.
    name: string,
    label: string,
    desc: string,
    type: "double",
    rangeMin: double,
    rangeMax: double,
    step: double
  },
  {
    // string: Text in quotation marks
    name: string,
    label: string,
    desc: string,
    type: "string"
  },
  {
    // boolean: true or false
    name: string,
    label: string,
    desc: string,
    type: "boolean",
  },
  {
    // uri: A fully qualified url as a string, or a multipart/form-data
    name: string,
    label: string,
    desc: string,
    type: "uri"
  },
  {
    // location: A map or object of a point and normal
    // Ex: {"point":[-0.012286,-0.017095,-0.02467],"normal":[-0.016623,0,0.999862]}
    name: string,
    label: string,
    desc: string,
    type: "location"
  },
  {
    // enum: A specified set of string options.
    name: string,
    label: string,
    desc: string,
    type: "enum",
    values: ["Option1","Option2","Option3"]
  }
];
We will focus on doubles in this tutorials, but will go on to learn how to use other UI Parameters later.
1. Base Model
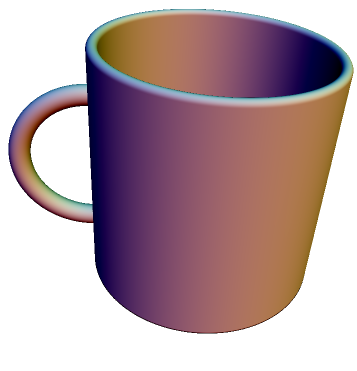
In ShapeJS we could model a coffee cup quite easily. However, it would just be one coffee cup, always. What if the shopper wanted to create an enormous coffee cup? Or adjust the thickness of the walls? We could try to create a bunch of different models for everything that a shopper might want from us, but that would be massively inefficient, and we could never hope to encompass every single possibility.
What if, instead, we let the shopper design his or her own mug? If we set up a user interface and let the shopper decide? To do so is actually quite simple. We can start with a fairly simple base model:
function main(args) {
  var height = 120;
  var thickness = 5;
  var radius = 60;
  var h_thickness = 5;
  var h_radius = 35;
  //Base Solid shape
  var base = new Union();
  var base_cyl = new Cylinder(new Vector3d(0,-height*MM/2, 0), new Vector3d(0,height*MM/2, 0), radius*MM);
  var base_rim = new Torus(radius*MM-thickness*MM/2, thickness*MM/2);
  var compTransform = new CompositeTransform();
  compTransform.add(new Rotation(Vector3d(1,0,0), Math.PI/2));
  compTransform.add(new Translation(new Vector3d(0, height*MM/2, 0)));
  base_rim.setTransform(compTransform);
  var handle = new Torus(new Vector3d(-(radius)*MM,0,0), h_radius*MM, h_thickness*MM);
  var seat = new Cylinder(new Vector3d(0,height*MM/2, 0), new Vector3d(0,(-height/2+thickness)*MM, 0), radius*MM);
  base.add(base_cyl);
  base.add(base_rim);
  base.add(handle);
  base.add(seat);
  //Portions for removal
  var remove_cyl = new Cylinder(new Vector3d(0,(-height+thickness)*MM/2,0), new Vector3d(0,(height+thickness)*MM/2,0), (radius-thickness)*MM);
  //Assembly
  var cup = new Subtraction(base, remove_cyl);
  var s = 250*MM;
  return new Scene(cup,new Bounds(-s,s,-s,s,-s,s));
}
2. UI Parameters
We can now take this base and add customizability to it. First, we need to set up all the variables we want to be able to change as UI elements. Then we can simply replace the parts in our code with hard-coded values with UI parameter variables. UI parameters are normally contained in the args argument. Referencing a parameter, say a parameter with the name "height", is done with args.height. The cup can now be easily customized.
What if, instead, we let the shopper design his or her own mug? If we set up a user interface and let the shopper decide? To do so is actually quite simple. We can start with a fairly simple base model:
var uiParams = [
  {
     name: "height",
     label: "Cup Height",
     desc: "Height of the cup",
     type: "double",
     rangeMin: 50,
     rangeMax: 200,
     step: 1,
     defaultVal: 120
  },
  {
     name: "thickness",
     label: "Cup Thickness",
     desc: "Thickness of the cup",
     type: "double",
     rangeMin: 3,
     rangeMax: 15,
     step: 0.5,
     defaultVal: 5
  },
  {
     name: "radius",
     label: "Cup Radius",
     desc: "Radius of the cup",
     type: "double",
     rangeMin: 25,
     rangeMax: 120,
     step: 1,
     defaultVal: 60
  },
  {
     name: "h_thickness",
     label: "Handle Thickness",
     desc: "Thickness of the handle",
     type: "double",
     rangeMin: 3,
     rangeMax: 15,
     step: 0.25,
     defaultVal: 5
  },
  {
     name: "h_radius",
     label: "Handle Radius",
     desc: "Radius of the handle",
     type: "double",
     rangeMin: 10,
     rangeMax: 100,
     step: 1,
     defaultVal: 35
  }
];

function main(args) {
  //Retrieve and scale shopper inputs
  var height = args.height*MM;
  var thickness = args.thickness*MM;
  var radius = args.radius*MM;
  var h_thickness = args.h_thickness*MM;
  var h_radius = args.h_radius*MM;
  //Base Solid shape
  var base = new Union();
  var base_cyl = new Cylinder(new Vector3d(0,-height/2, 0), new Vector3d(0,height/2, 0), radius);
  var base_rim = new Torus(radius-thickness/2, thickness/2);
  var compTransform = new CompositeTransform();
  compTransform.add(new Rotation(Vector3d(1,0,0), Math.PI/2));
  compTransform.add(new Translation(new Vector3d(0,height/2, 0)));
  base_rim.setTransform(compTransform);
  var handle = new Torus(new Vector3d(-radius,0,0), h_radius, h_thickness);
  var seat = new Cylinder(new Vector3d(0,-height/2, 0), new Vector3d(0,-height/2+thickness, 0), radius);
  base.add(base_cyl);
  base.add(base_rim);
  base.add(handle);
  base.add(seat);
  //Portions for removal
  var remove_cyl = new Cylinder(new Vector3d(0,(-height+thickness)/2,0), new Vector3d(0,(height+thickness)/2,0), radius-thickness);
  //Assembly
  var cup = new Subtraction(base, remove_cyl);
  var s = 200*MM;
  return new Scene(cup,new Bounds(-s,s,-s,s,-s,s));
}
Try adding in a slider to adjust how scaled the torus that makes up the handle is--they are rarely true half circles.
3. Limiting Certain Ranges
While we cannot have UI Parameters dynamically adjust one another, we can set up our maker to simply not allow certain combinations of values. Of course, it is best to inform the shopper of this. But it will allow you to avoid or lessen a maker's tendency to make unprintable things.
Currently our mug allows for thicknesses of just 3 MM. This is fine if someone decides to make a very small mug. But what if they make the mug gigantic? We need to put in some limitations so that they don't end up with a very fragile mug. We also probably want to limit the handle size, relative to the cup's height. As you may have noticed, it can be set too large to properly connect. By using if statements, we can easily thwart the shopper's attempts to make unprintable objects.

var uiParams = [
  {
     name: "height",
     label: "Cup Height",
     desc: "Height of the cup",
     type: "double",
     rangeMin: 50,
     rangeMax: 200,
     step: 1,
     defaultVal: 120
  },
  {
     name: "thickness",
     label: "Cup Thickness",
     desc: "Thickness of the cup",
     type: "double",
     rangeMin: 3,
     rangeMax: 15,
     step: 0.5,
     defaultVal: 5
  },
  {
     name: "radius",
     label: "Cup Radius",
     desc: "Radius of the cup",
     type: "double",
     rangeMin: 25,
     rangeMax: 120,
     step: 1,
     defaultVal: 60
  },
  {
     name: "h_thickness",
     label: "Handle Thickness",
     desc: "Thickness of the handle",
     type: "double",
     rangeMin: 3,
     rangeMax: 15,
     step: 0.25,
     defaultVal: 5
  },
  {
     name: "h_radius",
     label: "Handle Radius",
     desc: "Radius of the handle",
     type: "double",
     rangeMin: 10,
     rangeMax: 100,
     step: 1,
     defaultVal: 35
  }
];

function main(args) {
  //Retrieve and scale shopper inputs
  var height = args.height*MM;
  var thickness = args.thickness*MM;
  if (args.thickness < 5 && args.radius*2 + args.height > 150){
    var thickness = 5*MM;
  }

  var radius = args.radius*MM;
  var h_thickness = args.h_thickness*MM;
  var h_radius = Math.min(args.h_radius, args.height/2-args.h_thickness)*MM;
  //Base Solid shape
  var base = new Union();
  var base_cyl = new Cylinder(new Vector3d(0,-height/2, 0), new Vector3d(0,height/2, 0), radius);
  var base_rim = new Torus(radius-thickness/2, thickness/2);
  var compTransform = new CompositeTransform();
  compTransform.add(new Rotation(Vector3d(1,0,0), Math.PI/2));
  compTransform.add(new Translation(new Vector3d(0,height/2, 0)));
  base_rim.setTransform(compTransform);
  var handle = new Torus(new Vector3d(-radius,0,0), h_radius, h_thickness);
  var seat = new Cylinder(new Vector3d(0,-height/2, 0), new Vector3d(0,-height/2+thickness, 0), radius);
  base.add(base_cyl);
  base.add(base_rim);
  base.add(handle);
  //Portions for removal
  var remove_cyl = new Cylinder(new Vector3d(0,(-height+thickness)/2,0), new Vector3d(0,(height+thickness)/2,0), radius-thickness);
  //Assembly
  var cup = new Subtraction(base, remove_cyl);
  var s = 250*MM;
  return new Scene(cup,new Bounds(-s,s,-s,s,-s,s));
}